Windows Modules Installer Worker running with high CPU usage is a customary issue faced by the Windows users. This problem is most commonly experienced by the Windows 8.1 and 10 users. It is a very frustrating problem as it slows down the computer, and may lead to the “Freezing” of the system. Therefore, it is a must to fix this issue. In this article, I will describe how to fix Windows Modules Installer Worker High Cpu Usage in Windows 10, 8 and 7 in a simple manner using the provided step-wise guide.
I’m providing the best and simple solutions to get rid of this annoying problem.
Leave your worries right here and keep reading further.
Contents [hide]
What is Windows Modules Installer Worker
Windows Modules Installer worker (WMIW) or TrustedInstaller.exe (TiWorker.exe) is a Windows service for the automatic installation of the Windows updates. It is a system process that enables automatic installation, modification, and removal of Windows updates and optional components. It is absolutely essential to install and uninstall Windows updates for the better functioning and security of the overall system. Hence, WMIW or TiWorker.exe continuously keeps running to check for updates.

However, Sometimes this process gets messed up and results in a high CPU usage. Also, sometimes it reaches >50% of CPU usage. Consequently, this process causes load on the system, thus hanging or freezing all the other processes. Slowed down PC or Frozen computer are the symptoms of this issue. Unlike other common errors, restarting the PC won’t work in this case. You must resolve this issue manually as it is not able to fix by itself.
Fix Windows Modules Installer Worker- High CPU Usage
Preventing Windows Modules Installer Worker from working is not a solution to its high CPU usage problem. As updates are essential. Instead, I have compiled 3 working and simple solutions for you. You don’t need a bag of full of computer knowledge or tools to use them. Just follow the step-wise guide that I’m providing. Let’s move further to the solutions for Windows Modules Installer Worker high CPU usage problem.
1. Set Windows Update to Manual
This method works on the principle of switching the Windows Updates utilities from Automatic to Manual. So that it stops demanding power continuously. The major drawback of this method is that you have to keep looking for any Windows updates manually (weekly/monthly). Follo these steps in order to use this solution:
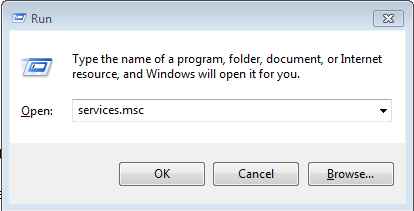
Step-1: Firstly, press the Windows + R key simultaneously in order to trigger the Run dialog box. Type services.msc in it and click Ok.
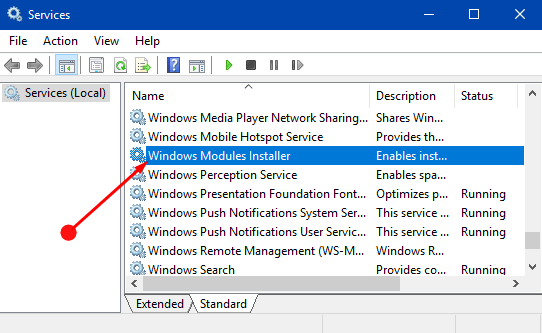
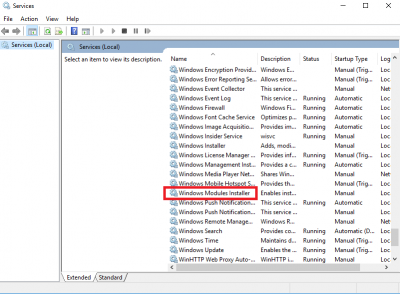
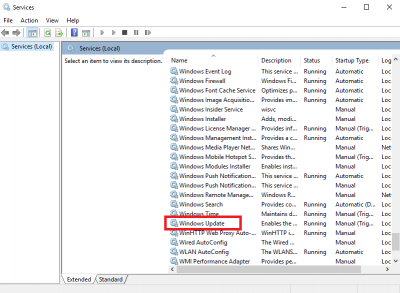
Step-2: In the Services window, locate and double-click on Windows Modules Installer. Its Properties window will open up.
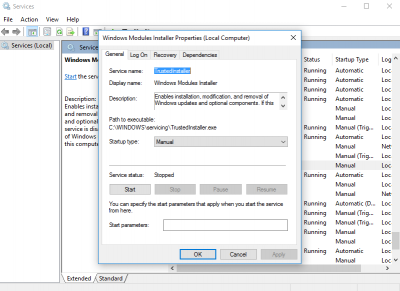
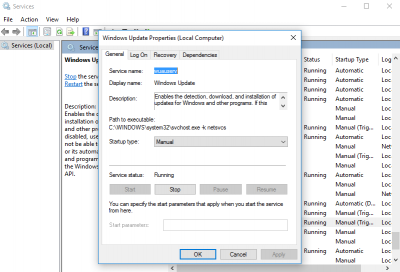
Step-3: In the resultant window, go to Startup type and change it to Manual. Startup type will be present under the General tab. Afterwards, click on Apply and then Ok.
Step-4: Now go back to the Services window again. This time double-click on Windows Update. Its Properties window will open up just like earlier.
Step-5: In the resultant window, go to Startup type and change it to Manual. Then click on Apply and then Ok.
Step-6: Restart your PC. Check if your problem is solved by accessing the Task Manager (Start Menu-> Task Manager).
After the successful application of this method, Windows Modules Installer Worker CPU usage would return back to its normal value. This is the most accurate and easy method to resolve this issue.
2. Use Windows Update Troubleshooter to Fix High CPU usage
This method uses the WindowsUpdateDiagnostic.diagcab tool (Windows Update Troubleshooter) to fix all the Windows Updates related issues. The Troubleshooter is easy to use and is able to rectify the Windows Modules Installer Worker high CPU usage problem in few minutes. Follow these steps in order to use this solution:
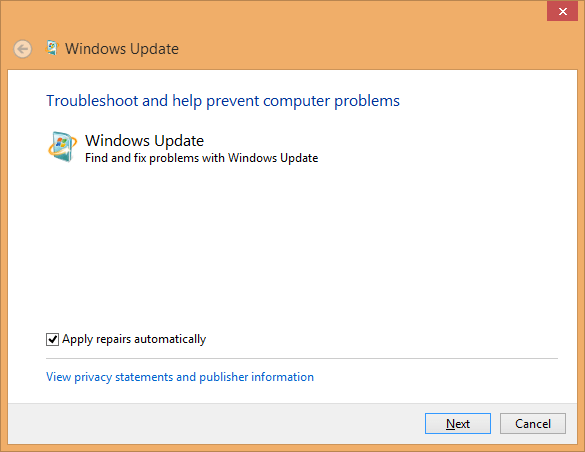
Step-1: Download Windows Update Troubleshooter from here.
Step-2: After setting it up, run the WindowsUpdateDiagnostic.diagcab tool.
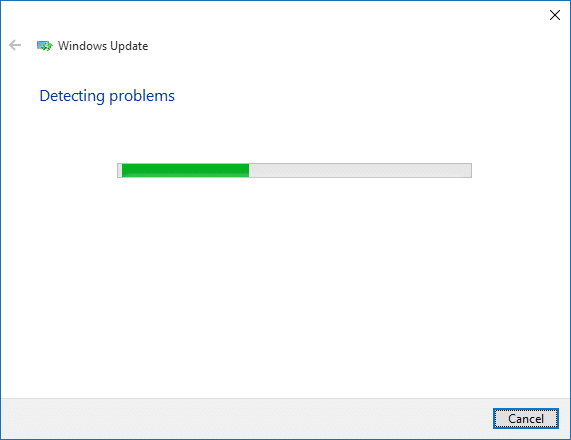
Step-3: The tool will resolve issues by checking registry keys and certain other things. Therefore, the process may take some time. Have patience and wait until the process is complete.
Step-4: After the “Troubleshooting has completed” message appears on your screen, click on the Close button.
Step-5: Restart your computer. Check if your problem is fixed by accessing the Task Manager (Start Menu-> Task Manager).
After you use Windows Update Troubleshooter properly, it will fix all the Windows Updates related problem including, Windows Modules Installer Worker high CPU usage. The computer will start working normally.
3. Set Your Connection as Metered
This method uses metered connections to prevent Windows from downloading and installing updates automatically. A metered connection is basically a connection with a limited data plan. To use this method, you should set all your connections as metered so that Windows is not able to get the updates automatically. This is the fastest solutions for the Windows Modules Installer Worker high CPU usage problem. I will explain the procedure separately for both Wifi and Ethernet users. Follow these steps in order to use this solution:
For Wifi Users:-
If you are using Wifi Internet, then follow the given method to get rid of high cpu usage error.
Step-1: Firstly click on the Wi-Fi sign. Select your Wi-Fi connection and then click on Properties.

Step-2: Now just turn the Set as metered connection button On.

For Ethernet Users:-
Ethernet users can solve this error by making a few changes in the Windows Registry Editor.
Step-1: Firstly, open Start menu and then type regedit in it. Now right-click on regedit (Registry Editor) and then select Run as administrator.
Step-2: A message prompt box will appear asking for your permission to let the Registry Editor make changes to your device. Click on Yes here.
Step-3: Now navigate to this path: HKEY_LOCAL_MACHINE > SOFTWARE > Microsoft > Windows NT > CurrentVersion > NetworkList > DefaultMediaCost. You can copy paste the path into the top bar to access it quickly.

Step-4: Afterwards, right-click on the DefaultMediaCost and then select Permissions. Permissions window will open then.

Step-5: In the Permissions window, click on the Advanced button present under Security tab.

Step-6: Now click on the change link present next to TrustedInstaller.

Step-7: Then type administrators in the Enter the object name to select box. Afterwards, click on the Check Names buttons to auto-complete the object name we need and then click OK.

Step8: Now on the Advanced Security Settings for DefaultMediaCost windows, check the Replace owner on subcontainers and objects box. Then click on Apply and then Ok.

Step-9: Afterwards, on the Permissions for DefaultMediaCost windows, select the Administrators group. Then make sure to check the Allow check box present next to Full Control. Then click on Apply and then Ok.

Step-10: Finally, double-click on the Ethernet entry and change the value data to 2 (1 means non-metered connection and 2 means metered connection) and then click OK. Ultimately, close the Registry Editor and then Restart your PC.

After the successful application of this method, Windows Modules Installer Worker will not be able to download and install the updates without your permission (Automatically). Therefore, its CPU usage would return back to the normal values.
Conclusion
These were the 3 Best Methods to fix Windows Modules Installer Worker high CPU usage problem. You are now aware of how to fix this issue in a simple manner. Remember if you are preventing the Windows to update automatically, you should keep updating them from time to time. Updating is a key aspect.
For any queries or suggestions, comment down in the Comments section below. Hope you found what you were looking for. Have a nice day, Folks!
https://windowsfish.com/fix-windows-modules-installer-worker-high-cpu-usage/
